Aesthetic rehabilitation. Non invasive ceramic veneers.
Nowadays, adhesive technology in dentistry allows us not only to create highly aesthetic and natural smiles, but also it gives us a possibility to be as much conservative, as we want to; in some cases, we even can perform high-end dentistry without any preparation at all.
The laboratory work was performed by Ivan Savula, from Lviv, Ukraine, a FSC member.
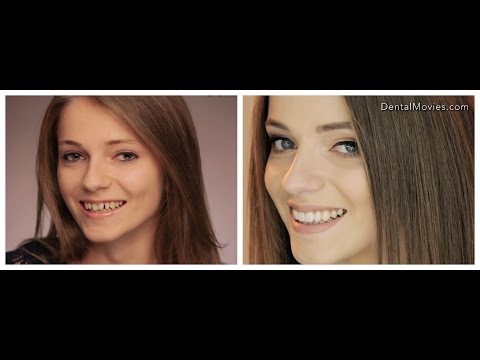
Initial situation. 20 years old girl wanted to have more harmonious smile. To achieve predictable results, we need to collect all available information, analyze the initial situation, patients wants and needs, make a virtual design of future smile and mock-up and only then we can create a treatment plan, choose the most appropriate technique and restorative materials. Initially, patient categorically refused the orthodontic treatment.

INFORMATION COLLECTING
When we are going to change the shape and size of teeth, we should understand that final teeth form must match and fit to facial appearance of our patient, otherwise, we risk to get beautiful teeth, which will disrupt the natural appearance of the face. So facial analysis is crucial step in our treatment planning and it should be performed as careful, as it is possible. As it is a lengthy process, which requires maximum attention to it, we make a video, that we scroll multiple times, trying to catch the smallest details to make the most important decisions in future smile planning.

Portrait photos are also important for planning future restorations.

Portraits with different smiles

Portraits with different head positions

Some details appear on smile close-up photo.


We also do photos for evaluation of the vestibular position.

Bottom view

Intraoral photo

Evaluation of the spaces in direct vision

Vestibular view

Analysis of a color was carried out using a photo with a polarizing filter and VITA shade guide.

We used ring flash to better visualyze existing texture.


The dimensions of the teeth can be measured during photography.

Or we can measure them on the cast.

Some pictures can have more artistic rather than the diagnostic value

In some cases it might be useful to analyze the teeth shape of close relatives, like in this case – a sister. Such information is especially valuable in cases, where we need to replace old restorations with inadequate shape.

ANALISYS AND DSD
Photos transferred to Keynote Mac OS, where we perform analysis and planning
Analysis of the facial aesthetics

Photo with retractors, face align on the horizon, central line is determined

Intraoral photo overlaid and positioned on photo with retractors.

Intraoral photo of the upper anteriors with horizon and central line

Gingival contour analysis

Analysis of teeth row shape

Analysis of the proportion of the centrals

Golden ratio analysis

After video, photo and models analysis, we started visualizing our decision. With collected information it’s easy to allocate optimal space for future restorations.

Optimal shape of the teeth has been chosen, and it matches to allotted space. The discrepancy between the position of the gingival margin of centrals is being ignored, because of lack of gingival visualization during a smiling and conversation. This and many other information we obtain from the video.

Further, the virtual ruler is calibrated.

Now we can measure the size of the future restorations. Height

Width

Other dimensions

Also, using different projections we can make a three-dimensional project of future smile.


In a simple way we can make a virtual mockup if its needed

WAX-UP AND MOCK-UP
Next step is a wax-up. Ideally, the technician must repeat the virtual design, if it coincides with the occlusion.
To verify the accuracy of matching, we have imposed the intraoral photo and photo of model changing their translucency

Reference points of horizon for technitian

DSD project imposed on the model

DSD project imposed on the model with wax-up

This projection better shows us harmony and beauty of our solution to close spaces.

Wax-up is powerful diagnostic tool and it should be precisely done in articulator

Silicon key is taken from the wax-up

Further, we are placing a bysacril material for the temporaries (in this case – Luxatemp DMG) in silicone key, and placing it intraorally

If we precisely trim the gingival outline of silicone key along the scallop of proposed gingival outline from teeth, it would be much easier for us to remove excess bisacryl material, as it will be mechanically clipped with silicone key.

Mock-up matches to a virtual project

Smile with mock-up

Smile from right and left

Mock-up should be analyzed in dynamics, which implies a video record. After proper video analysis, shape and dimensions have been approved by the patient and a team with a few corrections established by clinician –
1. centrals – shorter, guide – distal part of 11
2. centrals – rounded distal corners
3. laterals – shorter (0.2mm)
4. 22 medial highlight more medial

Before and with mock-up

Before and with mock-up

Mock-up

We decided to make four full non-invasive veneers on incisors and two partial non-invasive veneers on canines. Retraction was used for gingival tissue management (000 Ultrapack Ultradent), Then am A-Silicone impression material (Express, 3M Espe) was used to make the final impression Any preparation of the tooth has not been done, that means no temporaries were needed. The impressions and all relevant models were sent to the laboratory

Four feldspathic ceramic veneers were fabricated (Initial MC GC)


The thickness of the veneers was between 0.15 to 0.7 mm

Try in in the patients mouth


Veneers after try-in treated according to adhesive protocol

The adhesive preparing of the teeth we perform exclusively with rubber dam, as much as possible defending adjacent teeth at all stages – aluminum oxide, etching, bonding, fixation, etc..

The most convenient way for us to protect against dust if you use dry sandblaster – using of edible film. After protecting the adjacent teeth with matrices we put the film and make a hole in it for the nose of sandblaster

After sandblasting, we adapt teflon tape on the teeth to protect them from etching, bond excesses and fixation composite.

On authors opinion, the most comfortable is staggered fixation – it allows better control of restoration edges.

Then, after sandblasting and protecting adjacent teeth with teflon tape we etched teeth 11, 22, with 37% phosphoric acid for 30-40 seconds, washed it off and applied bond of the 4th generation adhesive system (Rock Bond Micerium), which is inflated and not light cured

Due to the fragility of feldspathic veneers, for fixation we used flowable[heated regular??] composite (Enamel Plus HRi Micerium), which is 78% filled.

We used colors A0.5, A3, and A5 to equalize the luminance

Remnants of composite on the floss knotted on top of the clamp

After fixation veneers on 11 and 22, the same steps were repeated with the veneers on the teeth 12, 21

After light curing in pulse mode for 5 seconds, we cut off the excess of composite and apply air block – ultrasound gel and light cure for 20 seconds on each side.

Preparation before fixation partial veneers on the canines

37% phosphoric acid for 30-40 seconds

In the end, we carry out finishing light curing on all sides for 60 seconds and polishing before removing the rubber dam

Result one week after fixation


New smile

Portrait


Of course, it is best to evaluate the result on the video

Focusing on a proper planning we can achieve a predictable result.


No comments: